I was inspired by my cousin to make a quilt for my son when he became and Eagle Scout to honor the special event. She had found a pattern designed by Quilt It editor Angie Hodapp in a magazine and sent me a copy of the directions. Below are two shots of one of her quilts (she made two) using Boy Scout fabric and a few embellishments. It looks like she had this professionally quilted. She used fabric markers to created the eagle and the Eagle medal and appliqued these on her quilts. I chose not to use those on my son's.
I decided to change the colors of my quilt to suit my tastes and I didn't use all Boy Scout fabrics. I was going for a different look from my cousin's original design. Instead of appliqueing the stars on the quilt squares I chose to paper piece my stars (I'm not very good at applique and stay away from it as much as possible). Below is a photo of my finished quilt.
I also used a vintage Boy Scout fabric for the entire back. The blue fabric with the badges (used on the wide border of my front) had a section of fabric with the word TROOP and all the numbers, so I pieced a line on the back of red fabric and used Troop 4 and Troop 278, the two Boy Scout troops my son had been a part of.
In the bottom left corner I used an iron-on label to print on and added it after quilting the piece.
Block size: 6" Quilt size: 58"x70"
Yardage is based on 42"-wide fabric. The yardage in parentheses is for borders cut crosswise and pieced.
Fabric Yard Cut
Red 5/8 16A
Blue Novelty Print 1 5/8 2 side borders 6 1/2"x54 1/2"
2 top and bottom borders 6 1/2"x42 1/2"
Gold Print 1 1/8 7 strips binding 2 1/4"x42", 20 stars (I actually used an
additional olive fabric for my final binding.)
Brown/Stars 1 3/8 20A, 16 stars (I actually used a light tan for 20A)
Tan Stripe 5/8 31B
Red Print 2 (5/8) 2 side borders 2 1/2"x66 1/2"
2 top and bottom borders 2 1/2"x58 1/2"
Dk Green 1 1/4 or 5 fat 1/4's 62B
Backing 3 5/8 2 horizontal panels 38"x62"
Batting 62"x74"
Border dimensions are the exact length required plus seam allowances.
Also need 2 yards lightweight fusible web for fusible applique
ASSEMBLY:
Wash and press the fabrics and cut according to directions
Prepare the stars for fusible applique referring to diagrams. Fuse stars to the A patches. Finish the edges of the stars. Make 20 X blocks and 16 Y blocks. My X blocks were brown on tan and my Y blocks were gold on red. My Z blocks were olive-tan-olive.
Referring to the Z block diagram sew a tan B between 2 olive B's mixing up the prints to keep the text upright. Press the seam allowances away from tan. Make 31 Z blocks.
Referring to the quilt assembly, arrange the X, Y, and Z blocks into 9 rows, rotating the Z blocks and alternating the stars as shown. Press seam allowances away from the Z blocks. Join the rows. Press the seam allowances between the rows in one direction.
 |
| sorry it's upside-down...but you get the picture |
Measure the quilt from top to bottom from raw edge to raw edge. Cut the side blue borders this length. Likewise, measure the quilt from side to side and cut the top and bottom blue borders this length. Matching centers and ends, add the side borders. Press the borders away from the quilt. Sew a Z block to each end of the top and bottom borders. Matching centers, ends, and seams, sew the borders to the quilt.
Sew the side red borders to the quilt and trim if necessary. Add the top and bottom borders and trim as needed.
Layer the quilt backing, batting, and top. Baste. Quilt in the ditch around the blocks. I also stitched around each badge in the border. Bind. I used this tutorial for machine binding. Works fantastic!
MY CHANGES:
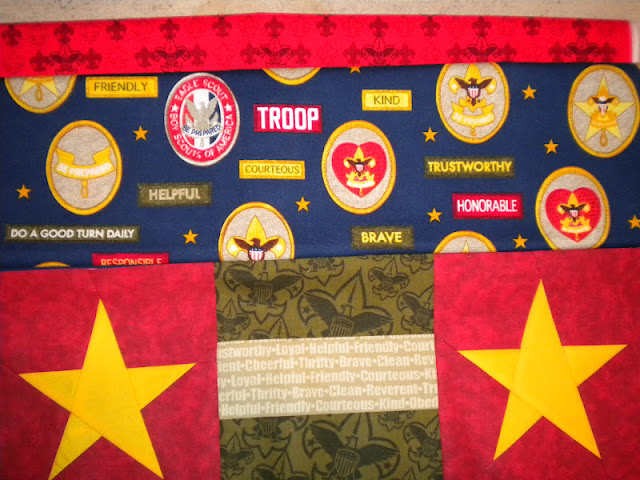
Below is a close-up of some of my fabric from the top row of stars and stripes to get a better idea of the fabrics I used. I did not use Boy Scout fabric for my star squares because the fabric was so cut-up and pieced.
Here is a close-up of the paper pieced star. I printed off a 5" star shape from Microsoft Word and drew the lines in for piecing. See my tutorial for help in making these squares. MY TUTORIAL
Carolyn "Care Bear" King


No comments:
Post a Comment